
Every website is very precious to its owner. Many websites are built with the WordPress cms framework. Today in this article I’m gonna guide you on how to increase your WordPress website security.
Here is a step by step activities that I did for my website Bharati Technologies.
As a leading Digital Marketing service in Kolkata, it is obvious to secure the website properly.
I also want to mention that every steps mention in this article is absolutely free of cost.
Don’t skip the article…I hope it will definitely help you a lot to configure WordPress security properly.
Table of Contents
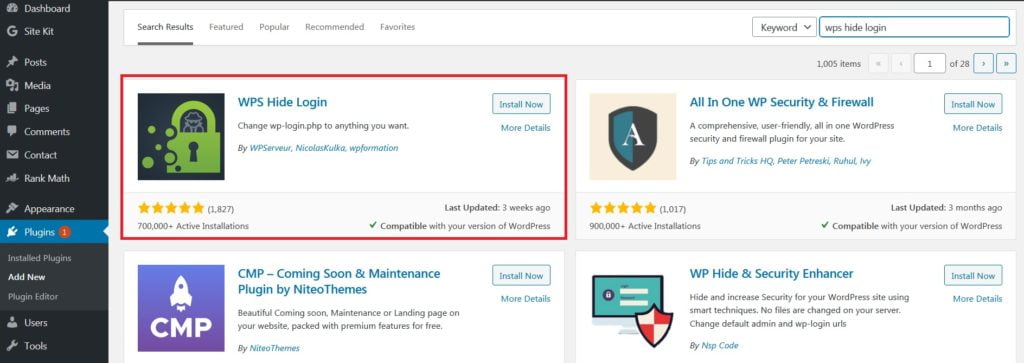
Install the WPS Hide Login Plugin:
This is very easy step to install this plugin. If you don’t know how to install the WordPress plugin here are the steps:
- Login to your WordPress dashboard
- Go to plugin menu in your left sidebar menu
- Click on the ‘Add New’ button on top
- Then write the plugin name ‘search plugin’ box
- Now you can see the result and also you can also understand whether this plugin is compatible with your WordPress version or not.
After installing the plugin click on the ‘settings’ menu in the left sidebar and click on the ‘WPS hide login’ menu.
It will redirect you to the ‘General Settings’ page.
At the bottom of the page under the ‘WPS Hide Login’ heading, you will find the text box for the login URL. Write a custom name for the login URL then click on the ‘Save Changes’ button.
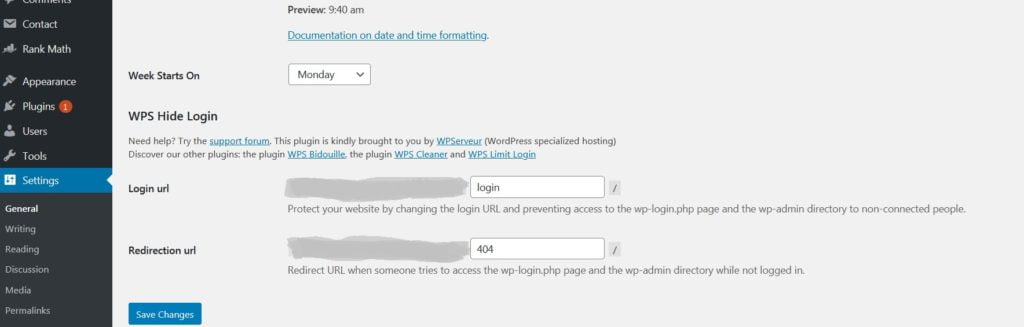
Write this URL in notepad or memorize it.
We know that WordPress’s common login URL is ‘Sitename/wp-admin’. For security purposes, it needs to customize this URL.
Install Wordfence Security Plugin:
By following the above steps install the Wordfence security plugin.
Like any other plugins, this plugin also has a free and paid version. Their paid version price for 1 site is around $99 for one year as on today.
Now the most important part of the plugin is ‘Two-Factor Authentication’.
This authentication will help you at the time of login. At the time of login after giving the user name and password in the login box then it needs a 2FA code. Which is available on your mobile phone. Without the correct code, the login will not be permitted.
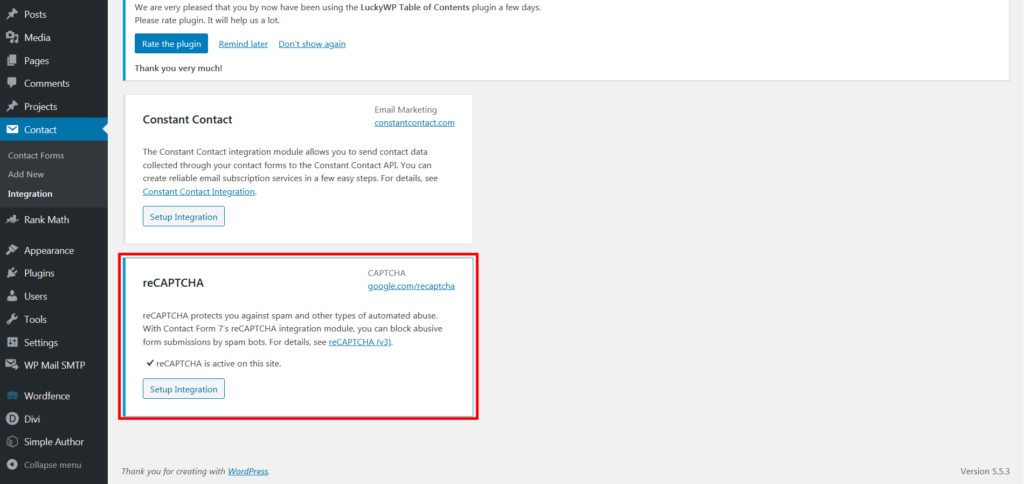
For this authentication, you need to have ‘Google reCAPTCHA v3 Site Key’. This another good way to secure your site. Let discuss it first then I will tell you how integrated ‘Two-Factor Authentication’.
How to use Google reCAPTCHA v3
Here are steps to configure Google reCAPTCHA v3:
- Login into your Gmail Account.
- Then click on this (URL: https://www.google.com/recaptcha/admin/create)
- Now register your site.
- Label: Put the name of your site in this box
- reCAPTCHA: I always prefer ‘reCAPTCHA v3’
- Domains: Copy and paste your domain or website name here.
- Accept their terms.
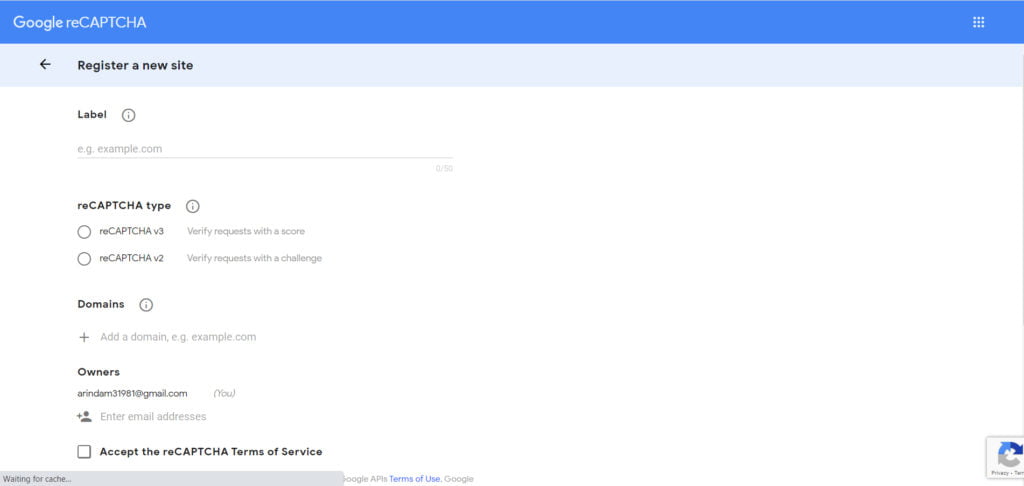
Then you can get the site key and secret key.
Note down this key.
If you forget or lost the key then here are the steps to get the key:
- Click on the ‘Admin Console’
- Click on the wheel icon or settings icon
- Then click on the reCAPTCHA keys link
- Get the key, copy the key on any notepad or word documents
Now you get ‘Google reCAPTCHA v3’.
Then back to the ‘Two-Factor Authentication’ topics.
You have previously installed the wordfence security plugin and you get the site key and secret key from ‘Google reCAPTCHA v3’.
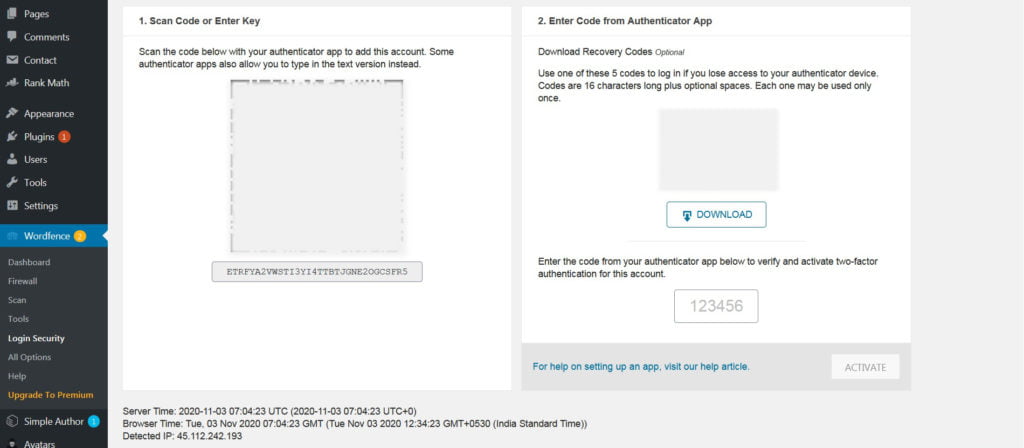
Here are the steps to configure wordfence login security:
- Click on wordfence then go login security menu.
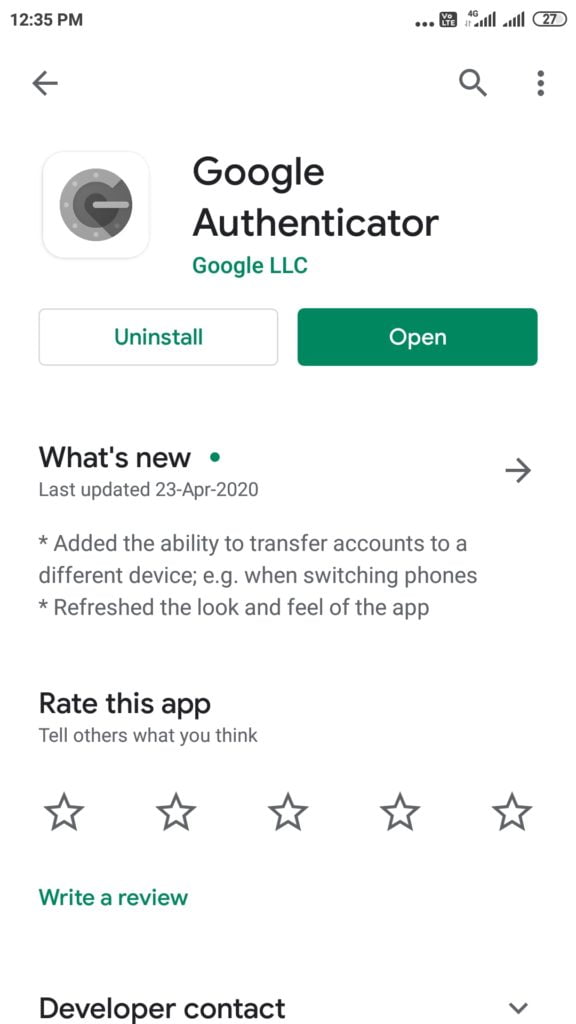
- Connect your phone to the internet and install Google Authenticator
- After installing the app, log in the app with your Gmail
- Then click on the ‘+’ icon in the bottom right of your screen.
- Click on the ‘Scan a QR Code’ button
- Scan the code appear on the login security page
- Download the recovery code before putting code from your phone
- Paste code in the right box (2. Enter Code from Authenticator App)
- Then click on the ‘Activate’ button
- Now your ‘Two Factor Authentication’ configure
Now here is the time to integrate ‘Google reCAPTCHA v3’ in the wordfence plugin.
The steps are:
- Click on the wordfence plugin menu in the left sidebar
- Then click on the Login Security box
- Now click on the settings at the top of the box
- Then click on the check box ‘Enable reCAPTCHA on the login and user registration pages’
- Give the site key and secret key on the respective box.
That’s all.
The next topic for security purposes is –
How to configure reCAPTCHA in contact form 7?
reCAPTCHA help to protect from spam and many types of automatic abuse.
If you configure this on your WordPress contact form then will help you to protect abusive and spammy comment.
Here are the steps to configure:
- Install the contact form 7 plugin (Plugin installation steps are already mentioned above)
- Click on the contact in the left sidebar
- Then click on the integration tab
- Click the button Setup Integration
- Put the site key and secret key in the respective box
- Finally, click on the Save Changes button
Another important factor for your WordPress site security is WordPress version. Always use the latest version of WordPress.
How to update WordPress version:
- Login to WordPress dashboard
- Click on the dashboard then click on the Updates tab
- Then click on the update button
Please note, the latest version of WordPress as of that date is 5.5.3.
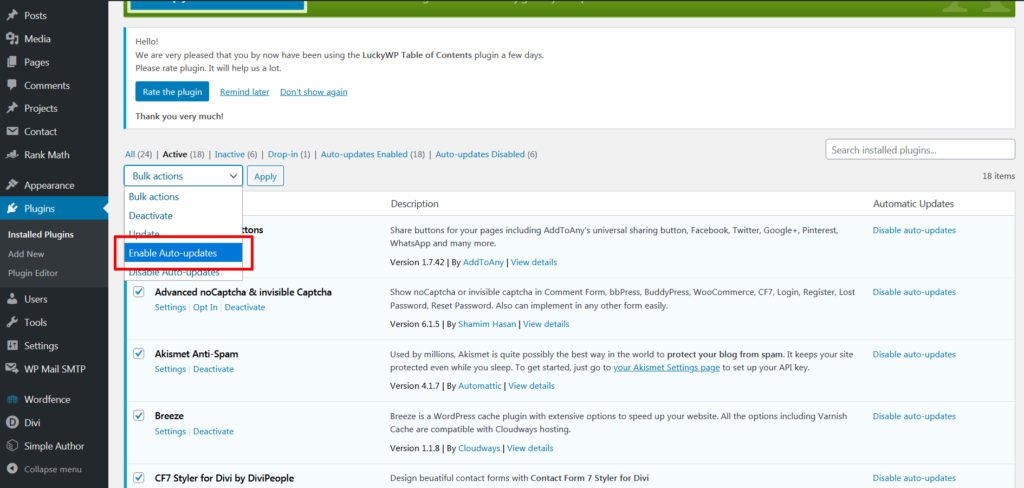
Another good practice is to auto update your WordPress plugin.
How to enable auto-update WordPress plugin:
- Login into your WordPress dashboard
- Click on the Plugins tab
- Then click on the installed tab
- Then select all the plugin
- Select the Auto-Updates menu from the top list
- Finally, click on the apply button
Then check the PHP version of your WordPress site. The latest PHP version helps you a lot to protect your site from any kind of hacking.
How to check the latest PHP version?
- Login to your WordPress dashboard
- Click on the Tools menu in the left sidebar
- Then click on the site health option
- Then check the PHP version on that page
If you are using an old PHP version then you will get a notification about improvement in PHP version in this section.
If you need to update PHP version then login to your server and find the option in your server dashboard. The dashboard or options are different depending on the site to site.
Another important thing I want to share with you regarding website security check is that –
How to check website security by Sucuri SiteCheck?
Sucuri is one of the best website security platforms.
Just click on the link (URL: https://sitecheck.sucuri.net/)
Write your website URL in the textbox. Then click on the ‘Scan Website’ button.
After getting the result you will be sure whether your website is secure or not.
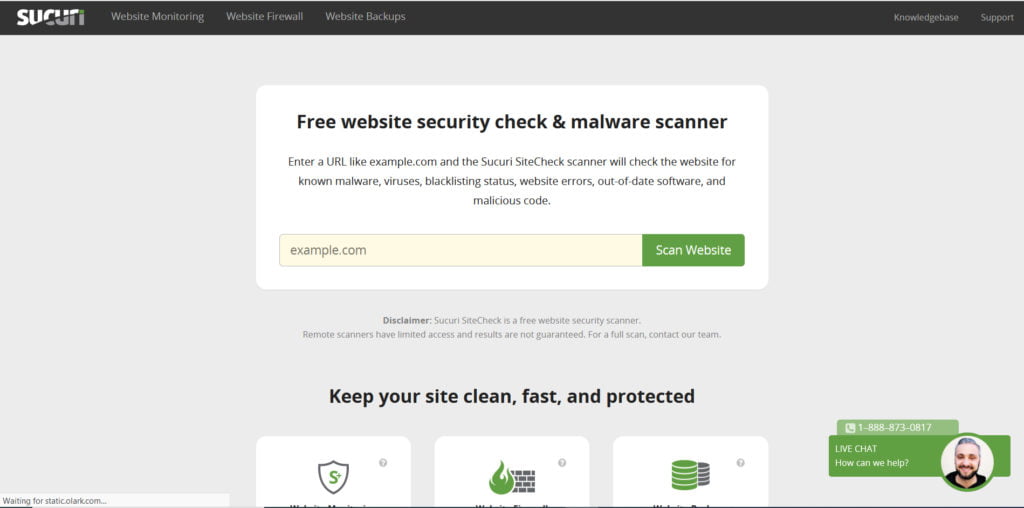
You can install ‘Sucuri wordpress plugin’ in your wordpress website.
Conclusion: The above mention steps are very simple way to secure your wordpress website. Any non-technical person can easily configure the above steps. There are many technical aspects in wordpress security which will discuss in next article.
Senior UX Designer and Google Certified Digital Marketer. Started my career as a full-time employee in different reputed companies and later established my own brand Bharati Technologies.