
If you want to know how to create a website for your business then read this guide. In this article, I will tell you a step-by-step guide for the installation of a website. So don’t be in a hurry…read till the end and I hope you will get all the answers to your queries related to website creation. Let’s get started.
Table of Contents
What is a website?
According to Google “a set of the related web page under a single domain name, typically produced by a single person or organization”. More precisely an internet address where you will find all the relevant information about any particular products or services.
So after reading this definition the question that comes to your mind is what is a domain name, what is a product or service mentioned in the above? Don’t worry I will tell you everything.
Now we know what is a website now the second most important question is –
Importance of websites?
Assume you have a service like pest control or you have a hotel in your locality. Like many other business owners, you are worried about your sales and it is very natural.
So that you want to spread the business operation area or you want to give advertisements for your business.
As you know a traditional advertisement is, an advertisement on television or newspaper.
But there are two prior disadvantages of this type of advertisement.
Publishing on television or in newspapers is more expensive. The second disadvantage is this is not customer-centric. If you show an advertisement for your pest control services on television or in the newspaper, the mass audience will see your ads. Mostly the non-targeted audience sees this ad. So your advertising budget in this sector is no doubt going to ruin.
Now coming to website or internet marketing, if you make a website for your product and services and send advertisements only for a targeted audience then it is much more worthy than traditional methods.
If you select Google or Facebook ads for your services like pest control then this ad is only visible to the audience who are looking for this kind of service. If your ads have this quality then you can get some leads or sales from them.
So creating a website and giving an advertisement based on this website is worth it. The main benefits of the creation of websites are:
- Creating a Brand
- Showcase your products or services on online platforms
- Cost-effective investments
- Reach target-oriented customers.
Now the next point is that :
Different types of website
Based on the features, the website has 3 types.
- Product Based Website – Where the showcase of products are listed, like eCommerce websites like amazon.com or flipkart.com
- Service-Based Website – The showcase of showing and listing various types of services. Like Bharati Technologies where you can find our list of services like web development, digital marketing, etc…
- Content-Based Website – A blog website. Like shoutmeloud.com where different topics are covered.
How to create a website free of cost?
As you know, website creation depends on the website’s nature. But before moving details about it you can create a website free of cost or pay for it.
Free version websites are good in some cases but they have lots of limitations. The following websites offer free versions:
- Blogspot.com
- Google Sites
- WordPress
- Wix
- Weebly
In most cases, you have to register with your Gmail account. Then they provide free themes and you will fill the themes with your information and publish the website.
The advantages of creating this kind of website:
- Free of Cost. You don’t spend a penny on this. Everything is free on those platforms.
- Get the website instantly. After giving the necessary information you can get this type of site with some clicks. The website is instantly ready to use.
- No Maintenance Cost. There is no maintenance cost. You don’t pay the annual hosting or domain charges for this kind of website.
The disadvantages of creating this kind of website:
- Fixed Layout. They provide you with the layout. You never change or edit the layout as you wish. There are always some constraints to this type of layout.
- Fixed Functionality. The functionality they provide is of utmost. You never change or implement any type of new functionality in those websites.
- SEO Ranking. From the search engine optimization point of this website is not worthy. You never customize the URL, use keywords in meta details, and various types of limitations are present in this type of platform.
- Termination. They have full rights to terminate your website at any time. As you are using their space or services free of cost so they have full rights to your website, not you.
Now you come to know the differences between the free version and paid version of those platforms and how to create a website free of cost.
In this article, I will tell you how to create a website from scratch with paid methods.
WHY?
Because the paid version of the website offers you various types of customization like your own house. You can edit the theme, change the layout or colors, implement more functionality, and make so many changes for the betterment of your website.
The main thing is that you have control over your website. You are the boss, you are the owner who can take the final decision about your website.
Before creating a website you need a domain.
What is a domain name?
Domain name means your website address. Like your residential property. Google.com, Bing.com, and Amazon.com all are domain names.
So before the creation of a website you need a good domain name.
How can you decide on a good domain name for your business?
Here are some important domain name selection tips:
- Always try to take a top-level domain name. A top-level domain name means it is the highest level in the hierarchical domain name system. An example of TLD is the ‘.com’ extension. A domain has various types of extensions like .com, .in, .edu, and so on. But for business purposes .com is the perfect one.
- Don’t use a big brand name with your domain. Like Adidas-sale.com or Flipkart-offer.com. Just select a simple domain name related to your business.
- Don’t use numbers or special characters in your domain name.
- The domain name must be short and easy to remember.
- Use a keyword in your domain name.
- Make your domain name a brandable one.
If you are still confused about how to create a domain name then you can visit https://domainwheel.com/, a domain name generator website. Just put your keywords in their search then they will show you various options for this.
When you finally select the domain name then book the domain name accordingly. Here is the list of domain name booking websites:
- https://in.godaddy.com/
- https://www.hostgator.in/domain-registration
- https://www.hostinger.in/domain-checker
- https://www.bigrock.in/
- https://domains.google/intl/en_in/
When you try to book a domain name, you will see they are offering a hosting plan also.
Hosting a space where your files and documents related to the website should be kept. To run a website hosting is very much necessary.
You can either buy the hostings from the same domain name providers or purchase them separately.
If you are a newbie then I suggest purchasing the hostings from domain name providers.
As a newbie, if you are looking for less expensive domain and hosting providers then my suggestion goes for hostinger.com. This website is comparatively cheap and has lots of attractive features.
Among the features, they are offering free ‘SSL Certificates.
SSL Certificates is a digital certificate it authenticates the website’s encrypted connections with the website identity.
In today’s perspective, it is very much necessary.
So Hostinger offers this certificate free of cost. In addition, if you want privacy protection or a daily backup of your website then it will be good for your website.
Privacy protection is a service provided by the hosting company so that users never find out the owners and whereabouts of the website. For security reasons, some exchange is necessary.
If you want to know the domain or hosting details of any website then just go to this website https://who.is/ and find all the ownership, hosting, and domain-related details.
As I am using Hostinger for a couple of years here I will show you how you can purchase a domain + host from Hostinger
How to buy Domain & Hosting from Hostinger?
First of all, go to the official website of Hostinger.
Then click on the ‘start now button. Then choose a hosting plan. Right now they are offering three types of hosting plans.
One is for single web hosting, premium web hosting, and business web hosting.
If you are a newbie then choose single web hosting. Then click on the ‘add to cart button.
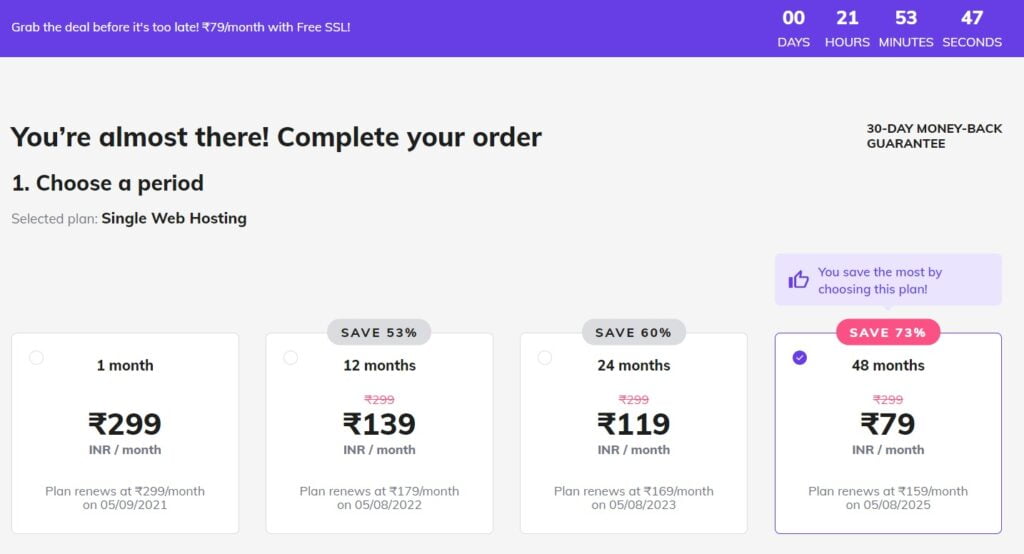
Then choose a period. They are offering 4 types of periods, 1 month, 12 months, 24 months, and 48 months.
The 48 months is comparatively cheaper than others. This is only ₹79 (Rupees seventy-nine).
Then create an account with your business or whatever email id you have.
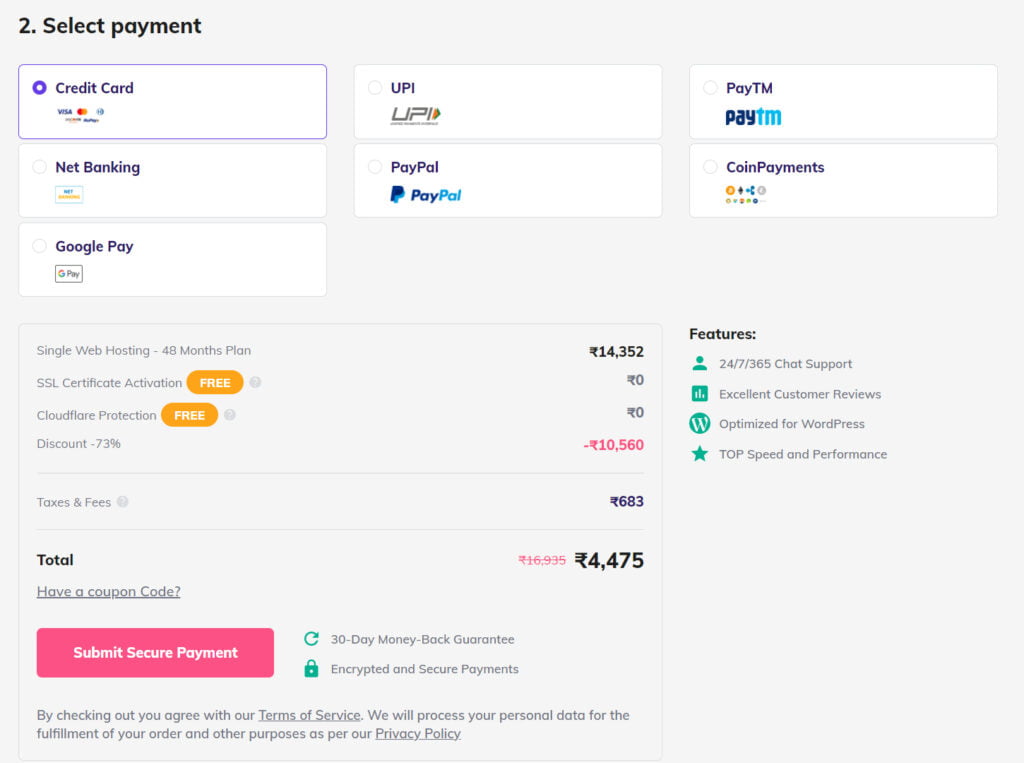
Then select the payment options. Right now you can buy this by the following payments methods:
- Credit Card
- UPI
- Paytm
- Netbanking
- Paypal
- Coinpayments
- Google Pay
If you select 48 months with ₹79 then the total bill will be only ₹4,475.
They are offering an SSL Certificate, Cloudflare Protection & Discount of 73%.
Remember this price and offer are only visible today (05.08.21) from India. I don’t know whether the offer will extend or not.
Now after ‘secure payments’ your hostings and domain will be booked.
In some plans, they are offering a ‘Free Domain’ option.
So according to the flow of this article, it is assumed you have purchased a good domain name with hosting plus SSL, privacy protection, and daily backup of your website.
Your domain and hostings are ready NOW.
Then it is time for you to decide how you can create this website.
There are two types of websites according to functionality. One is static and another one is dynamic.
A static website is a website whose data never changes or occasionally changes.
A dynamic website is a website in which data is changed every time and there are lots of options available in the backend to change the website data.
Static website extensions are generally .html, like index.html, about.html, and so on.
But if it is dynamic then the extension is yourwebsitename.com/about or yourwebsitename.com/contact-us.
When you are reading the above paragraphs you found a new term ‘backend’.
What is the backend?
Backend the controlling section of the website from where every part of a website is controlled and managed accordingly.
For website creation purposes you must be using a content management system framework or cms framework. There are lots of different types of cms platforms available on the internet. But among all the most commonly used, most user-friendly cms framework is ‘WordPress’.
So after domain and hosting, you have to install a cms framework like WordPress.
In Hostinger’s‘ H-Panel’ dashboard there are options for auto installations. From there you can create your WordPress website with some easy clicks.
How to install WordPress in Hostinger?
After purchasing the domain a screen will appear like this.
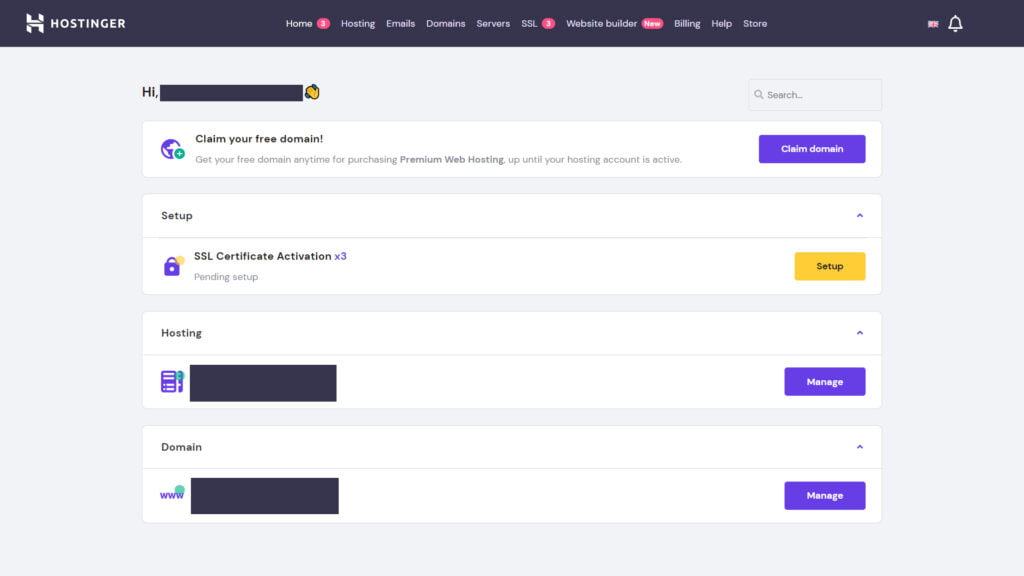
Then click on the ‘Manage’ button under the hosting options.
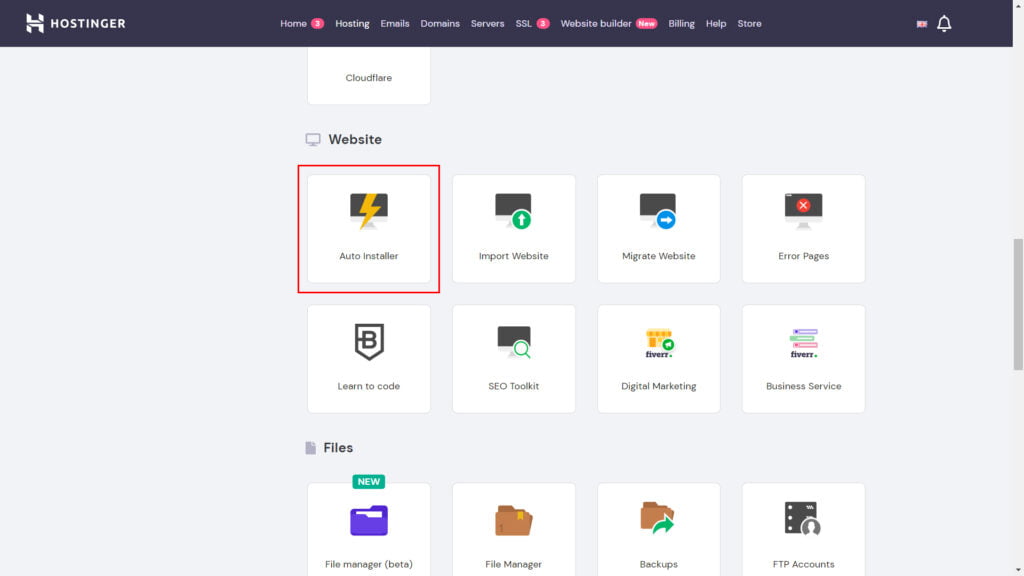
Then scroll down and go to Auto Installer under the Website tab.
Next click on the WordPress options by clicking select.
After that, a popup will appear. Put website name, and website title, and then click on install options.
How to access the website from Hostinger?
Similarly, come to the auto-installer section. At the top of that, you will see the installed website.
Then click on the three dots menu. Select manage options.
A separate screen will appear. Then click on the ‘Edit Website’ button on the right-hand side.
It will launch you to your WordPress dashboard.
Alternatively, just write the website name in the browser’s address bar. The write wp-admin. (yourwebsitename.com/wp-admin)
This way you can access the website. One thing is to write down the username and password in a separate place for future use.
When you create a WordPress website you will get a default theme in WordPress. That is ‘Twenty Twenty One.
If you are satisfied with this theme or the layout of this theme then you can go with this otherwise if you want to create a separate layout then you can use other themes.
You may create a single-page or multiple-page website by using the WordPress framework.
Based on your services there are lots of WordPress themes available on the internet.
Recently I have been creating a travel website. For that, I have used the travel press WordPress theme. Similarly based on the services you will find lots of themes available.
To use this theme just log in with your website then go to the theme options, search the theme and implement this one.
Otherwise, go to Google, then find a free theme, like ‘travel free WordPress theme download’ and go to the particular website and download this.
After that go to your website theme sections, upload this theme and activate it.
Then you need to customize the theme and fit it with your content and images. Every theme has documentation for customization.
Also, be careful about WordPress security. Download the themes only from any trusted website.
If you still feel difficulties installing a website, installing WordPress, or theme customization then you must contact us. We are always ready to help you.
Now we are in the fifth step.
We have already discussed these steps:
- Domain Booking
- Hosting Booking
- WordPress Installations
- Theme Installations and Customizations
The fifth step is you have to index the website on Google.
For this purpose, you need a Gmail. Try to create a separate Gmail from where like busines.companyname@gmail.com. So that every type of business use or correspondence is based on this Gmail.
Then go to Google search console and you will find there are two options. One is for domain and another one is for URL prefix.
We are using a URL prefix. Give your website URL, then verify the domain by some steps they suggest, and finally, your website gets indexed by Google.
Then submit a sitemap. These options are available in the left-hand menu under sitemaps options.
Before submitting a sitemap you have to create a sitemap. You can use it in two ways.
Go to the online XML sitemap generator website and generate the sitemap. Then go to your console or FTP and upload this sitemap. After that give the sitemap URL in the sitemap tab in the Google search console.
The second way is to install a plugin named ‘Yoast SEO’. Then find the sitemap options in this plugin. Then post this URL in Google Search Console.
I know this is not an easy process. But there are lots of tutorials and videos available on the internet from which you can get ideas.
Similarly, you can add Google analytics. Go to the Google Analytics website.
Click on the admin in the bottom left of the menu. Then click on ‘create account’, then create a property, then click on create a view.
After that your analytics account will be created.
You can also read the article ‘eCommerce Website Development Cost: Comprehensive Guide (2020)’ to know how you can create a product-based website.
Final Words: These are the simple 5 steps you can take to create a website. I know if you are a newbie then you can face lots of difficulties in every step. If you need help then contact us or post your queries in the comment sections of this article.
Senior UX Designer and Google Certified Digital Marketer. Started my career as a full-time employee in different reputed companies and later established my own brand Bharati Technologies.